Rendering Entities in a GUI
- Blog Entry 1
- 2025-11-10
A painful experience turned into a learning opportunity. I want to share my journey, hoping it helps others avoid the pitfalls I encountered.
Links:
NOTE
This blog post shows code snippets of Minecraft and other Minecraft mods. All code is the property of their respective owners. This blog post is for educational purposes only and is not affiliated with Mojang or Microsoft in any way.
Introduction
In this blog post, I discuss the challenges and solutions I encountered while rendering entities in a GUI for my Minecraft mod. My name is rlnt, also known as Relentless. I have been a mod developer for over 10 years. Within the organization Almost Reliable, we primarily develop utility mods for pack developers, many KubeJS-related mods, and occasionally a small content mod.
This post is aimed at fellow mod developers who may face similar challenges. Even if you are new to modding, have limited experience, or are just curious about the technical aspects of Minecraft modding, I hope you find this post informative and engaging. It may also help players understand the effort and challenges involved in creating mods and why certain features sometimes take longer than expected to implement.
I have little understanding of OpenGL, the technology behind Minecraft's graphics. Most of what I know comes from trial and error, reading existing code, and learning from others over the years. Rendering is a highly mathematical concept. Most of the following content covers vectors and matrices. I am no mathematician, but school-level math and a good understanding of 3D space should be enough to grasp the concepts.
I try to use minimal technical jargon and explain concepts accessibly to a broad audience. The screenshots and code snippets illustrate the points throughout this post.
Challenge
Rendering entities within a GUI in Minecraft has various use cases. I wanted to develop a Just Enough Items (JEI) plugin for my mod Summoning Rituals (SR). SR allows pack developers to create custom recipes with item and entity inputs, as well as item, entity, and command outputs. Pack devs can also attach many conditions to these recipes and customize them further via events.
To display a recipe to a player, a mod developer typically adds integration for recipe viewer mods. Since JEI is the most popular, I started by adding support for it. SR already existed in versions before 1.21.1 and had working JEI support. The entity renderer was pretty basic, though.
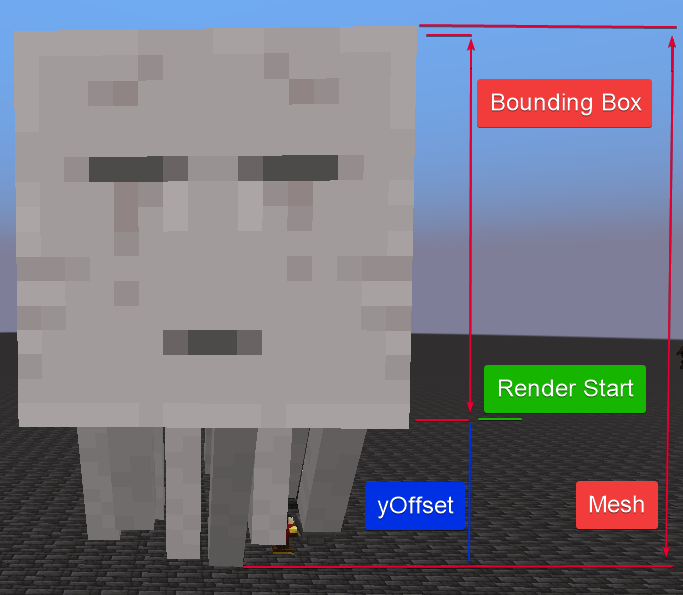
The biggest challenge when rendering entities is that Minecraft does not expose their actual sizes. The only available information is their bounding box, which does not always accurately represent their visual size. Consider the Ghast: the tentacles are not included in the bounding box, leading to a misleadingly small representation if rendered based on that. Another challenge is the height offset. Some entities align on the Y-axis plane, meaning they sit right on the ground. Others start below it or hover above.
The main question is how to determine the correct scale and offset for each entity to display them properly within the GUI. How do you work around the limitation of only knowing the bounding box? How do you handle entities with unique models or animations?
NOTE
Although this blog post focuses primarily on rendering entities in a JEI GUI, the concepts and techniques can be applied to any GUI context where entities need to be displayed.
Start
To understand how to render entities in a GUI, one needs to understand that the rendering itself is still 3D. Minecraft uses a 3D rendering engine based on OpenGL. Even when rendering in a 2D GUI, the entities are still 3D models rendered in a 3D space. To achieve the desired appearance, an orthographic projection is used, which flattens the 3D space onto a 2D plane without perspective distortion.
Additionally, it is essential to grasp the basics of JEI integrations and the role of custom ingredient renderers. They serve as the entry point for all rendering logic.
JEI Integration Basics
To display recipes in a recipe viewer like JEI, many steps are involved: creating a custom plugin, a recipe category, registering additions, and more. All of that is out of scope for this blog post.
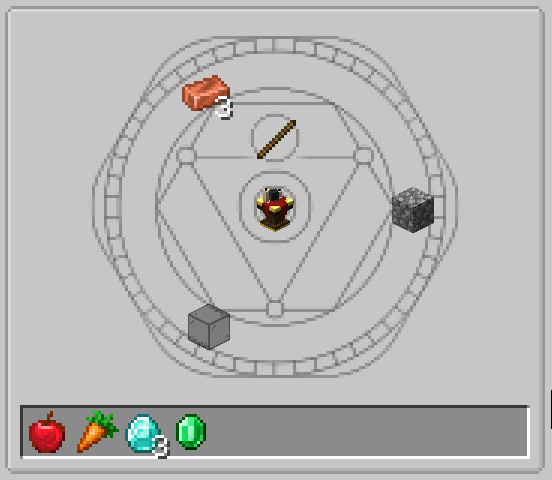
I already implemented a basic display category for my SR recipe that shows item inputs and outputs. All inputs are aligned in a circle around the altar block in the center. Above the altar block is the catalyst needed to start the ritual. The items at the bottom represent the ritual outputs.
To support entity displays within this category, a custom ingredient type is required. The key point is that each custom ingredient type needs a custom renderer. A renderer is responsible for drawing a single ingredient in the GUI, including bookmarks and item slots within the recipe. In this case, the ingredient is an entity. Basic implementations of an entity ingredient and renderer look as follows.
public final class EntityIngredient {

    // Holder<EntityType<?>> is a raw definition of the entity used to create
    // an actual instance in the current world
    private final Holder<EntityType<?>> entityType;
    @Nullable private Entity entity;

    public EntityIngredient(Holder<EntityType<?>> entityType) {
        this.entityType = entityType;
        var level = Minecraft.getInstance().level;
        if (level != null) {
            this.entity = entityType.value().create(level);
        }
    }

    @Nullable
    public Entity getEntity() {
        return entity;
    }
}public final class EntityIngredientRenderer implements IIngredientRenderer<EntityIngredient> {
@Override
public void render(GuiGraphics guiGraphics, EntityIngredient entityIngredient) {
// rendering logic here
}
@Override
public List<Component> getTooltip(EntityIngredient entity, TooltipFlag tooltipFlag) {
// tooltip logic here
}
}Entity Ingredient
The EntityIngredient receives a Holder<EntityType<?>>, a raw definition of the entity used to create an instance in the current world. Upon initialization, it creates the entity using the provided EntityType and stores it for later use. It exposes the created entity via a getter.
Entity Ingredient Renderer
The EntityIngredientRenderer implements JEI's IIngredientRenderer interface. It's responsible for drawing the EntityIngredient within the GUI. The render method contains the actual rendering logic. The ingredient and renderer must be registered in the JEI plugin to be used.
The render method receives an EntityIngredient instance, providing access to the underlying entity. GuiGraphics is a Minecraft helper class, more about it later.
Initial Approach
The common approach to a concept in Minecraft modding you have no experience with is to examine how vanilla does it. "Vanilla" refers to the unmodified Minecraft version released by Mojang. This blog post has been written at the time of Minecraft 1.21.1, right after Mojang announced they will remove obfuscation in future versions. This means learning from vanilla code will become much easier in the future. For now, I relied on decompiled code and community mappings, which complicated the process.
First, ask yourself: Where does vanilla use similar functionality?
I recalled that Minecraft renders an entity in the inventory screen. In the end, the player is also just an entity. The same concept applies to other entities.
Investigation led to the InventoryScreen class. The renderEntityInInventory method contains everything needed. Due to length and license, I omit the full code. Relevant parts follow.
Lighting.setupForEntityInInventory();
EntityRenderDispatcher renderDispatcher = Minecraft.getInstance().getEntityRenderDispatcher();
if (cameraOrientation != null) {
    entityrenderdispatcher.overrideCameraOrientation(
        cameraOrientation.conjugate(new Quaternionf()).rotateY((float) Math.PI)
    );
}

entityrenderdispatcher.setRenderShadow(false);
RenderSystem.runAsFancy(
    () -> renderDispatcher.render(
        entity,
        0.0, 0.0, 0.0,
        0.0F, 1.0F,
        guiGraphics.pose(), guiGraphics.bufferSource(),
        15728880
    )
);
guiGraphics.flush();
entityrenderdispatcher.setRenderShadow(true);
Lighting.setupFor3DItems();Breakdown step by step:
- Lighting Setup (line 1):
Sets lighting suitable for inventory entity rendering, ensuring the entity appears well-lit. - Entity Render Dispatcher (line 2):
Obtains theEntityRenderDispatcherfrom the Minecraft instance, which manages entity rendering. - Camera Orientation (lines 3–7):
Overrides default camera orientation if provided, to render from the desired angle. Vanilla uses this to rotate the player model with mouse movement. - Shadow Rendering (line 9):
Disables shadows temporarily to avoid affecting GUI appearance. - Rendering Execution (lines 10–18):
Performs rendering withinRenderSystem.runAsFancyto respect user quality settings. Calls the dispatcher'srendermethod with position, rotation, and lighting parameters. - Buffer Flushing (line 19):
Flushes the graphics buffer to execute all rendering commands. - Restoring State (lines 20–21):
Re-enables shadows and lighting to restore original state.
Following the vanilla example, I implemented a first approach in my renderer. I kept the logic similar but skipped camera orientation since entities in my GUI do not need to follow mouse movement.
@Override
public void render(GuiGraphics guiGraphics, EntityIngredient entityIngredient) {
    if (!(entityIngredient.getEntity() instanceof LivingEntity entity)) {
        // don't render if null or not a living entity
        return;
    }

    var poseStack = guiGraphics.pose();
    poseStack.pushPose();
    {
        Lighting.setupForEntityInInventory();
        var entityRenderer = Minecraft.getInstance().getEntityRenderDispatcher();
        entityRenderer.setRenderShadow(false);
        RenderSystem.enableBlend();

        RenderSystem.runAsFancy(() -> entityRenderer.render(
            entity, 0, 0, 0, 0, 1, guiGraphics.pose(), guiGraphics.bufferSource(),
            LightTexture.FULL_BRIGHT
        ));
        guiGraphics.flush();

        entityRenderer.setRenderShadow(true);
        Lighting.setupFor3DItems();
    }
    poseStack.popPose();
}
The implementation mirrored vanilla closely. I checked if the entity exists and is a LivingEntity, which covers all mobs. Non-living entities like item frames or boats were unsupported, as I had no use case in my mod.
Rendering in GUIs involves GuiGraphics, a Minecraft helper that simplifies GUI rendering. Via guiGraphics.pose(), the PoseStack can be accessed. It's a stack-based structure for managing transformations (translation, rotation, scaling). It holds coordinate systems that can be modified and restored hierarchically. pushPose() adds a new matrix to the stack for transformations without affecting prior state. popPose() reverts to the previous state. The { ... } block after pushPose() is a an optional style choice to visually separate affected code.
With that implemented, the recipe still looked the same. The entity ingredients still needed to be added to the category display. To avoid bloating the post, I won't include that here. After defining slots and assigning ingredients with the custom renderer, the recipe looked as follows.
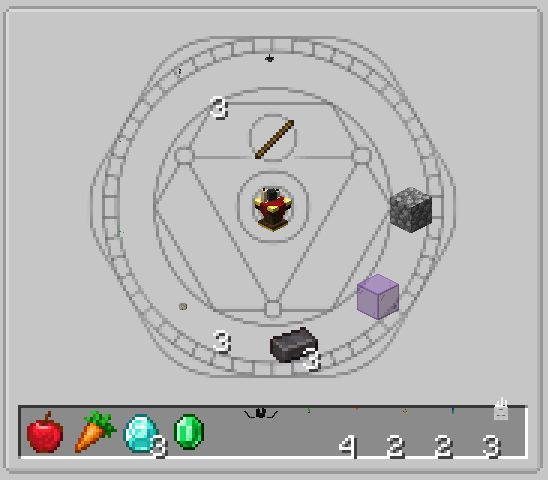
Though hard to spot, entities were being rendered. I used various entities to test appearance. The Ghast, because it is so large, was clearly visible. A good start, but a lot more was needed for proper display.
Renderer Transformations
As seen above, entities appeared small and upside down. I cannot fully explain why, but this is common when rendering in Minecraft. Blocks in GUIs behave similarly. It likely relates to the 2D coordinate system setup.
I did not mention earlier that the PoseStack transforms the viewport. It hosts a matrix defining the current coordinate system. Applying transformations to the PoseStack affects the underlying matrix: translate (move), rotate, or scale. Since JEI's render method provides GuiGraphics with the PoseStack, and it is called per slot, the matrix is positioned at the slot's upper-left corner in the recipe layout. Thus, entities rendered in the corner, not centered.
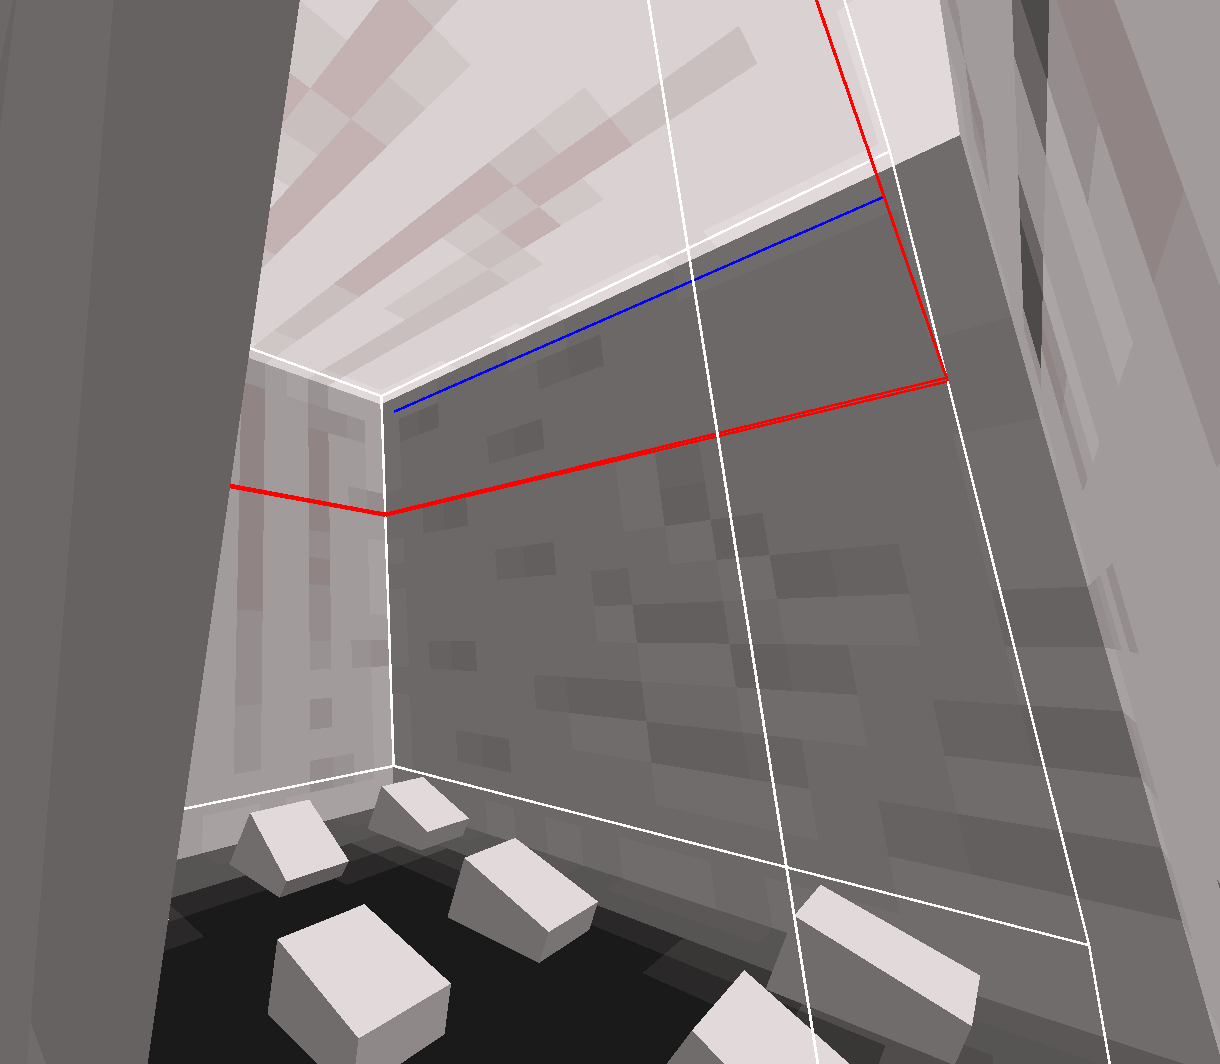
Typically, in 3D, axes look like this (source): 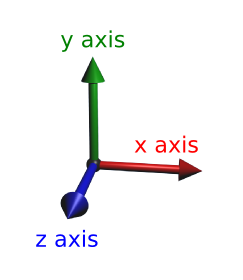
But entities being upside down in my initial approach indicated an inverted Y-axis meaning positive y values go downward. I verified this by translating the matrix along the Y-axis, proving the assumption.
| Code | Before | After |
|---|---|---|
poseStack.translate(0, 10, 0); |  |  |
The matrix uses relative coordinates starting at the slot origin 0, 0, scaled to a single pixel. To transform the matrix so entities render centered and correctly oriented, I applied a 180° rotation around the Z-axis (depth axis) and translated the matrix by half the slot width and the full slot height. This aligned entities with the slot's bottom center. The translation occurs before rotation to ensure correct axes. Translating shifts the origin position, and rotation uses the matrix origin as the angle.
In modern game development, rotations typically use quaternions. Quaternions are a mathematical concept that provides a way to represent rotations in 3D space without suffering from issues like gimbal lock. Quaternions are a complex topic and would likely require their own blog post. If you want to learn more about them, I recommend checking their Wikipedia article.
For my needs, it was simple. Minecraft provides quaternion helpers. The 100 was applied to the Z-coordinate to ensure the entity is rendered in front of other GUI elements avoiding clipping into the background (known as Z-fighting).
private static final int SLOT_SIZE = 16;
// ... inside render method
poseStack.translate(SLOT_SIZE / 2f, SLOT_SIZE, 100);
poseStack.mulPose(Axis.ZP.rotationDegrees(180));| Before | After |
|---|---|
|  |
For better visibility, I also applied uniform scale 6.0f to the matrix.
| Code | Before | After |
|---|---|---|
poseStack.scale(6.0f, 6.0f, 6.0f); | |  |
Interim Conclusion
Rendering entities in a GUI is straightforward once you master PoseStack transformations. However, many more challenges remained.
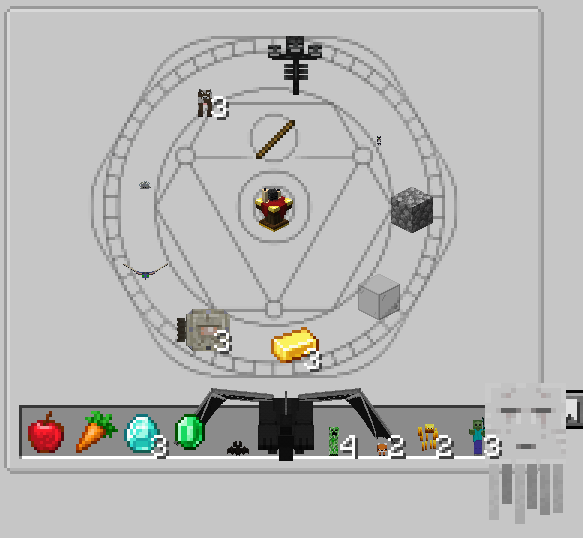
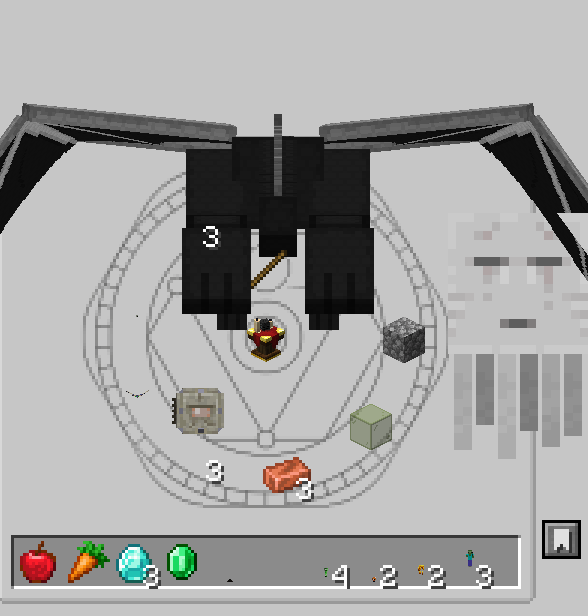
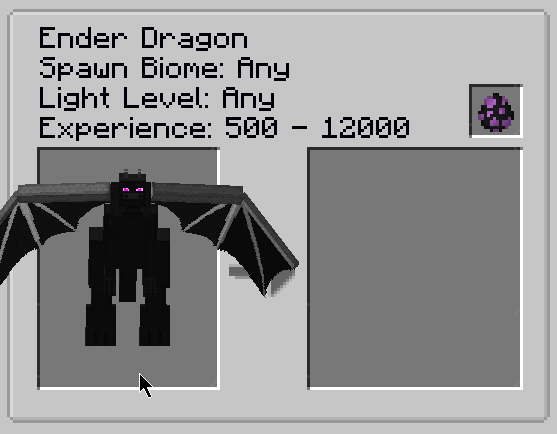
Since each entity has a different size, uniform scaling yielded inconsistent appearance. Large entities overflowed, small ones were unrecognizable. Some entities behaved oddly, as you can see below. The Bat and Ender Dragon faced the opposite direction. The Ghast was miscentered with its tentacles overlapping slot borders.
It seemed the entity dispatcher aligned the entities using their bounding box. This worked for most but caused issues for entities like the Ghast, whose model extended beyond the box. Minecraft's debug bounding box rendering confirmed this.
| Bat | Creeper | Wither | Ghast |
|---|---|---|---|
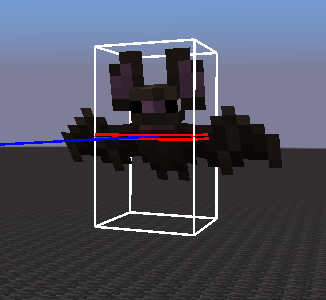 | 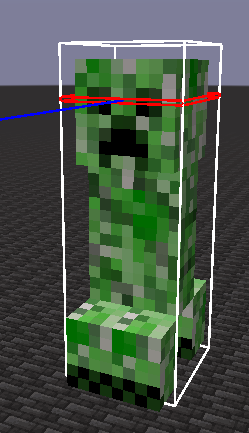 | 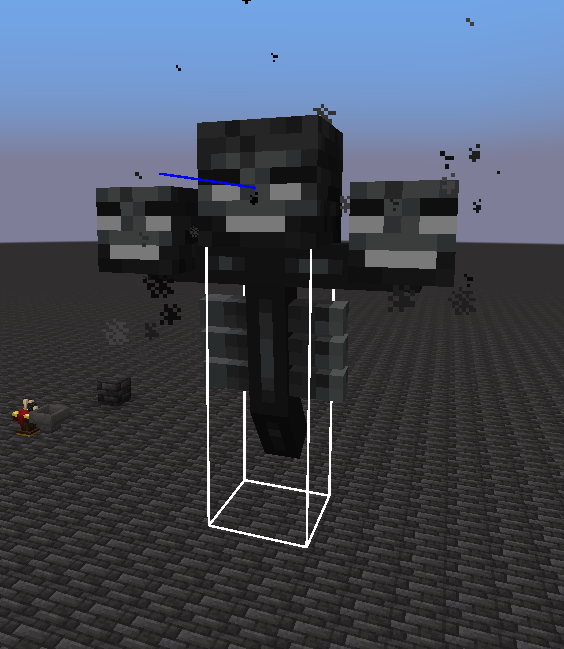 | 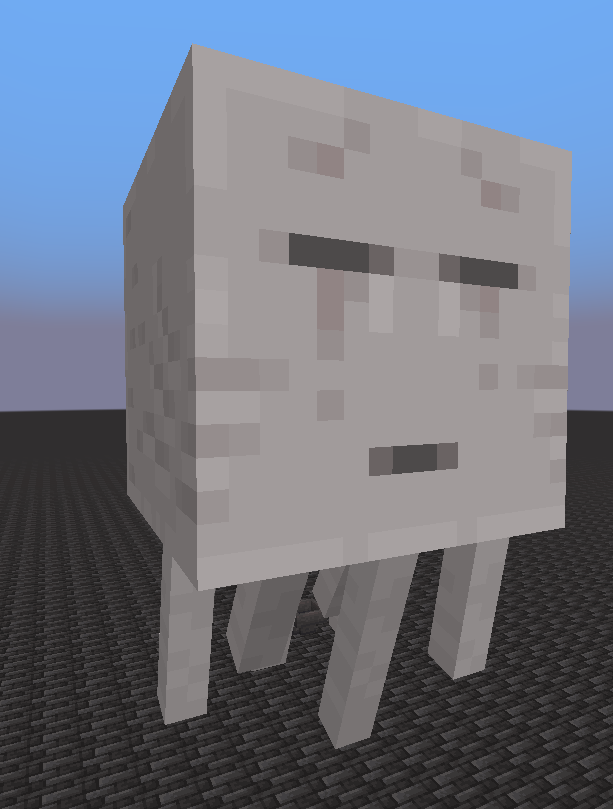 |
As you can see, bounding boxes are simple rectangular prisms encapsulating the entity, ignoring the actual model. You might be wondering where the bounding box of the Ghast is. As mentioned previously, it's a special case. The tentacles and part of its head are excluded from the bounding box, causing misalignment and overlap.
Entity Scaling and Offsetting
To address these issues, I needed to determine correct scale and offset per entity. This proved tricky.
Looking at Vanilla code is a good start, but modders also draw inspiration from other mods. Several mods render entities in GUIs. A popular one is Just Enough Resources, a JEI add-on displaying additional info about loot drops. For the loot drop overview, they display an entity in JEI.

Their codebase revealed the following logic.
private float getScale(LivingEntity livingEntity) {
    float width = livingEntity.getBbWidth();
    float height = livingEntity.getBbHeight();
    if (width <= height) {
        if (height < 0.9) return 50.0F;
        else if (height < 1) return 35.0F;
        else if (height < 1.8) return 33.0F;
        else if (height < 2) return 32.0F;
        else if (height < 3) return 24.0F;
        else if (height < 4) return 20.0F;
        else return 10.0F;
    } else {
        if (width < 1) return 38.0F;
        else if (width < 2) return 27.0F;
        else if (width < 3) return 13.0F;
        else return 9.0F;
    }
}

private int getOffsetY(LivingEntity livingEntity) {
    int offsetY = 0;
    if (livingEntity instanceof Squid) offsetY = 20;
    else if (livingEntity instanceof Turtle) offsetY = 10;
    else if (livingEntity instanceof Witch) offsetY = -5;
    // ... many more entities
    else if (livingEntity instanceof Creeper) offsetY = -15;
    else if (livingEntity instanceof AbstractPiglin) offsetY = -15;
    return offsetY;
}
This is a simple and efficient approach, but only covers vanilla entities. Custom mod entities require hardcoded integration. My goal was a future-proof dynamic solution for any entity.
To start I reused logic from older SR versions. For the old renderer I used plenty of debugging and a spreadsheet to track the entity sizes and offsets. I then used a reference value, in this case the Creeper bounding box height, calculating scale factors.
private static final float CREEPER_HEIGHT = 1.7f;
private static final float CREEPER_SCALE = 0.5f;
// ... inside render method
var entityHeight = entity.getBbHeight();
var entityScale = Math.min(CREEPER_HEIGHT / entityHeight, 1f) * 16;
var scaleFactor = CREEPER_SCALE * size * entityScale;
// render logic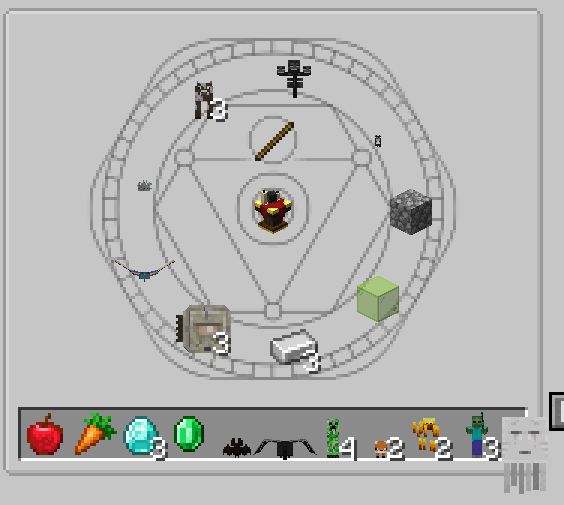
This calculation primarily focused on height, was more dynamic than hardcoding, but was still limited. Most entities are taller than wide. Entities wider than tall were overflowed. Additionally, since the bounding box was the only available info, entities with models beyond the box were misaligned.
Entity Measuring
Next, I sought the actual entity size. Minecraft does not expose it directly. My only idea was to parse the model files of each entity. But this would be tedious and error-prone. So I stuck with bounding boxes temporarily.
Later, discussing on Discord with fellow modders, one suggested a new approach. Huge shoutouts to embeddedt for the idea.

But what does this mean?
The entity render dispatcher uses a BufferSource, which is responsible for managing vertices sent to the GPU. Vertices (plural for vertex) are points in 3D space defining the corners of geometric shapes. In 3D graphics, objects are typically represented as a collection of vertices connected by edges and faces to form polygons, usually triangles. You have probably heard of this before. Explaining this concept in detail would go beyond the scope of this blog post. The only thing you need to know is that each entity is made up of many vertices that define its shape. This is unrelated to the bounding box. It is the actual model geometry also known as the render shape or the mesh.
Typically, when working with a BufferSource, you obtain a VertexConsumer from it by specifying a render type. Minecraft uses a lot of different render types for different purposes (solid objects, translucent objects, cutout objects, and more). After obtaining the VertexConsumer, it can be used to add vertices. Each vertex has a position in 3D space, as well as other attributes like color, texture coordinates, and normals.
The idea embeddedt came up with is a custom VertexConsumer exposed by a dummy BufferSource tracking the minimum and maximum coordinates of all vertices added to it without rendering. By doing this, you can effectively measure the mesh of the entity based on its geometry rather than relying on the bounding box. Check out my implementation below. It captures the minimum and maximum per axis, ignoring render type, colors and other unnecessary properties.
MeasuringBufferSource and MeasuringVertexConsumer
public class MeasuringBufferSource implements MultiBufferSource {

    private final MeasuringVertexConsumer instance = new MeasuringVertexConsumer();

    @Override
    public VertexConsumer getBuffer(RenderType renderType) {
        // same consumer for all layers, we care only about positions
        return instance;
    }

    @Nullable
    public MeasuringResult getData() {
        return instance.data;
    }

    public record MeasuringResult(float minX, float minY, float minZ, float maxX, float maxY, float maxZ) {

        public static final MeasuringResult EMPTY = new MeasuringResult(0, 0, 0, 0, 0, 0);

        MeasuringResult(float x, float y, float z) {
            this(x, y, z, x, y, z);
        }

        MeasuringResult measure(float x, float y, float z) {
            var mMinX = Math.min(minX, x);
            var mMinY = Math.min(minY, y);
            var mMinZ = Math.min(minZ, z);
            var mMaxX = Math.max(maxX, x);
            var mMaxY = Math.max(maxY, y);
            var mMaxZ = Math.max(maxZ, z);
            return new MeasuringResult(mMinX, mMinY, mMinZ, mMaxX, mMaxY, mMaxZ);
        }
    }

    private static final class MeasuringVertexConsumer implements VertexConsumer {

        @Nullable
        private MeasuringResult data;

        private void record(float x, float y, float z) {
            if (data == null) {
                data = new MeasuringResult(x, y, z);
            } else {
                data = data.measure(x, y, z);
            }
        }

        @Override
        public VertexConsumer addVertex(float x, float y, float z) {
            record(x, y, z);
            return this;
        }

        @Override
        public VertexConsumer setColor(int r, int g, int b, int a) {
            return this;
        }

        @Override
        public VertexConsumer setUv(float u, float v) {
            return this;
        }

        @Override
        public VertexConsumer setUv1(int u, int v) {
            return this;
        }

        @Override
        public VertexConsumer setUv2(int u, int v) {
            return this;
        }

        @Override
        public VertexConsumer setOverlay(int overlay) {
            return this;
        }

        @Override
        public VertexConsumer setNormal(float nx, float ny, float nz) {
            return this;
        }
    }

}
Recall the Initial Approach section. It uses the BufferSource provided by the GuiGraphics for rendering. I kept that since it's responsible for drawing the entity on the screen but I recreated the logic with the custom MeasuringBufferSource, retrieving the data, and using it for scaling and offsetting. Combining that with the rotation, slot centering, and the scaling logic of old SR versions, I ended up with the following code.
private static final float CREEPER_HEIGHT = 1.7f;
private static final float CREEPER_SCALE = 0.5f;
private static final int SLOT_SIZE = 16;

@Override
public void render(GuiGraphics guiGraphics, EntityIngredient entityIngredient) {
    if (!(entityIngredient.getEntity() instanceof LivingEntity entity)) {
        // don't render if null or not a living entity
        return;
    }

    var poseStack = guiGraphics.pose();
    poseStack.pushPose();
    {
        poseStack.translate(SLOT_SIZE / 2f, SLOT_SIZE, 100);
        poseStack.mulPose(Axis.ZP.rotationDegrees(180));

        var entityHeight = entity.getBbHeight();
        var entityScale = Math.min(CREEPER_HEIGHT / entityHeight, 1f) * 16;
        var scaleFactor = CREEPER_SCALE * entityScale;
        poseStack.scale(scaleFactor, scaleFactor, scaleFactor);

        Lighting.setupForEntityInInventory();
        var entityRenderer = Minecraft.getInstance().getEntityRenderDispatcher();
        entityRenderer.setRenderShadow(false);
        RenderSystem.enableBlend();

        MeasuringBufferSource measuringBufferSource = new MeasuringBufferSource();
        RenderSystem.runAsFancy(() -> entityRenderer.render(
            entity, 0, 0, 0, 0, 1, poseStack, measuringBufferSource,
            LightTexture.FULL_BRIGHT
        ));

        RenderSystem.runAsFancy(() -> entityRenderer.render(
            entity, 0, 0, 0, 0, 1, poseStack, guiGraphics.bufferSource(),
            LightTexture.FULL_BRIGHT
        ));
        guiGraphics.flush();

        entityRenderer.setRenderShadow(true);
        Lighting.setupFor3DItems();
    }
    poseStack.popPose();
}Line 28 created an instance of MeasuringBufferSource. Lines 29-32 called the render method of the entity dispatcher. This didn't render anything, but populated the buffer with vertex data, which was accessible via measuringBufferSource.getData(). This did not handle scaling and offsetting just yet. But it gave good insight on the measured entity data in comparison to their bounding box.
| Entity Type | min X | min Y | min Z | max X | max Y | max Z |
|---|---|---|---|---|---|---|
| bat bbox | -0.25 | 0.0 | -0.25 | 0.25 | 0.9 | 0.25 |
| bat mesh | 283.406 | 281.186 | 99.937 | 284.593 | 281.999 | 100.062 |
| blaze bbox | -0.3 | 0.0 | -0.3 | 0.3 | 1.8 | 0.3 |
| blaze mesh | 347.377 | 280.249 | 99.582 | 348.455 | 281.746 | 100.561 |
| cat bbox | -0.3 | 0.0 | -0.3 | 0.3 | 0.7 | 0.3 |
| cat mesh | 343.873 | 175.399 | 98.906 | 344.127 | 176.004 | 100.651 |
| cow bbox | -0.45 | 0.0 | -0.45 | 0.45 | 1.4 | 0.45 |
| cow mesh | 279.625 | 174.436 | 99.375 | 280.375 | 175.999 | 100.875 |
| creeper bbox | -0.3 | 0.0 | -0.3 | 0.3 | 1.7 | 0.3 |
| creeper mesh | 299.739 | 280.374 | 99.625 | 300.261 | 281.999 | 100.375 |
| elder_guardian bbox | -0.998 | 0.0 | -0.998 | 0.998 | 1.997 | 0.998 |
| elder_guardian mesh | 278.739 | 237.647 | 95.511 | 281.244 | 239.997 | 101.244 |
| ender_dragon bbox | -8.0 | 0.0 | -8.0 | 8.0 | 8.0 | 8.0 |
| ender_dragon mesh | 309.730 | 278.217 | 93.219 | 322.269 | 282.297 | 108.878 |
| fox bbox | -0.3 | 0.0 | -0.3 | 0.3 | 0.7 | 0.3 |
| fox mesh | 331.749 | 281.280 | 98.862 | 332.250 | 281.999 | 100.687 |
| ghast bbox | -2.0 | 0.0 | -2.0 | 2.0 | 4.0 | 2.0 |
| ghast mesh | 377.75 | 277.945 | 96.545 | 382.25 | 285.422 | 102.25 |
| phantom bbox | -0.45 | 0.0 | -0.45 | 0.45 | 0.5 | 0.45 |
| phantom mesh | 264.816 | 207.637 | 99.042 | 267.246 | 208.260 | 100.577 |
| silverfish bbox | -0.2 | 0.0 | -0.2 | 0.2 | 0.3 | 0.2 |
| wither bbox | -0.45 | 0.0 | -0.45 | 0.45 | 3.5 | 0.45 |
| wither mesh | 310.5 | 158.498 | 99.242 | 313.5 | 161.735 | 100.528 |
| zombie bbox | -0.3 | 0.0 | -0.3 | 0.3 | 1.95 | 0.3 |
| zombie mesh | 363.481 | 279.777 | 99.718 | 364.517 | 281.999 | 101.216 |
The data showed the minimum and maximum values of the axis-aligned model geometry. Subtracting yielded the actual size. Looking at the Ghast, the model extends significantly beyond its bounding box, especially in height. This confirmed the observation about the Ghast's misalignment in the slot.
Using this, I improved the scaling and offsetting. Accounting for wide entities, I decided to use all dimensions when calculating the scale factor. For that, I used the diagonal size of the measured mesh.
float dx = maxX - minX;
float dy = maxY - minY;
float dz = maxZ - minZ;
float diagonal = (float) Math.sqrt(dx * dx + dy * dy + dz * dz);
With the diagonal size for the scale and the measured height for the offset, I ended up with the following code.
// ... inside render method after measuring
MeasuringResult data = measuringBufferSource.getData();
if (data == null) return;

float dx = data.maxX() - data.minX();
float dy = data.maxY() - data.minY();
float dz = data.maxZ() - data.minZ();
float diagonal = (float) Math.sqrt(dx * dx + dy * dy + dz * dz);
poseStack.scale(diagonal, diagonal, diagonal);

float height = data.maxY() - data.minY();
poseStack.translate(0, height, 0);

RenderSystem.runAsFancy(() -> entityRenderer.render(
    entity, 0, 0, 0, 0, 1, poseStack, guiGraphics.bufferSource(),
    LightTexture.FULL_BRIGHT
));
// ... rest of render logic
The result looked like a huge step back. However, the scale and offset calculations were now dynamic based on the measured mesh size which was a good foundation for further improvement. The next step was to normalize the scale and offset to fit the slot.
Normalization
To tackle normalization, a mathematical formula that maps the measured size to a target size was required. Trial and error (I am bad in mathematics) yielded a formula that already matched my expectations quite well.
float dx = data.maxX() - data.minX();
float dy = data.maxY() - data.minY();
float dz = data.maxZ() - data.minZ();
float diagonal = (float) Math.sqrt(dx * dx + dy * dy + dz * dz);
float scale = 18f / (float) Math.pow(diagonal, 0.9);
poseStack.scale(scale, scale, scale);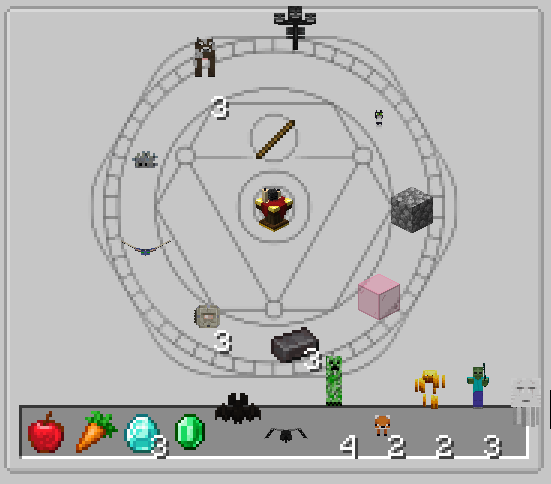
The formula used a target size of 18 acting as a global modifier. Changing it would make all entities larger or smaller. The exponent of 0.9 to the diagonal size reduced the impact of larger entities. They were scaled down more aggressively than smaller entities resulting in a more consistent appearance across different entity sizes.
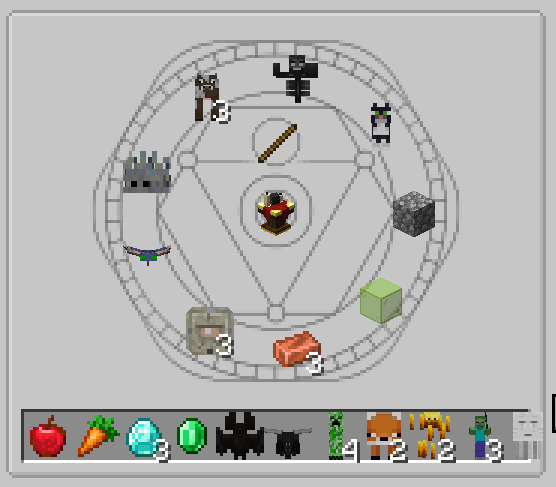
Scaling looked alright. Entities shrunk to the slot size consistently. However, the offset was wrong. Because I shifted the offset by the measured height, entities aligned with the bottom of the slot appeared too high. I subtracted their bounding box height from the current offset to fix this.
float height = data.maxY() - data.minY();
poseStack.translate(0, height - entity.getBbHeight(), 0);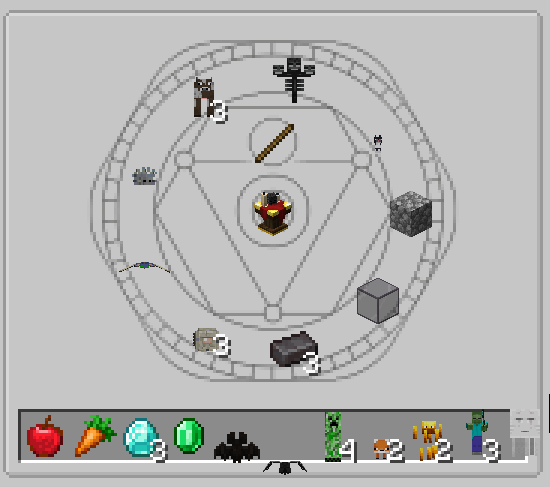
Animations
Looking pretty good, but the entities were static and looked dull. To improve the visual appearance, I added their animations to the rendering. The entity renderer handles animations based on the entity's age in ticks. In a client-side environment, the current tick count is stored in the player of the current Minecraft instance. This can simply be applied to the entity before rendering it.
Minecraft mc = Minecraft.getInstance();
if (mc.player != null) {
    entity.tickCount = mc.player.tickCount;
}
Entities now animated as they would in the game. Exceptions like the Ender Dragon seemed to use a custom animation system that changes state based on factors like its phase or the attack target. Enabling the animations brought up another issue.
Some entities jittered. This was very noticeable for entities like the Blaze or the Ghast. When the render method was called on every frame, the measuring logic was called on every frame as well. Entities alternating in height during their animations jittered because their total height changed slightly on each frame. I fixed this by caching the measuring results per entity.
Caching is the process of storing data in a temporary storage. It can be accessed more quickly in the future. A cache needs a unique key to identify each entry. Since an entity with the same identifier will have the same model, I cached the measuring results by the entity identifier. I used a simple Map mapping from the identifier to the measuring result.
private final Map<String, MeasuringResult> measuringCache = new HashMap<>();
// ... inside render method after setting up the renderer
MeasuringResult data = measuringCache.computeIfAbsent(
    entityId, id -> {
        MeasuringBufferSource measuringBufferSource = new MeasuringBufferSource();
        RenderSystem.runAsFancy(() -> entityRenderer.render(
            entity, 0, 0, 0, 0, 1, poseStack, measuringBufferSource,
            LightTexture.FULL_BRIGHT
        ));

        return measuringBufferSource.getData();
    }
);

float dx = data.maxX() - data.minX();
float dy = data.maxY() - data.minY();
float dz = data.maxZ() - data.minZ();
float diagonal = (float) Math.sqrt(dx * dx + dy * dy + dz * dz);
float scale = 18f / (float) Math.pow(diagonal, 0.9);
poseStack.scale(scale, scale, scale);

float height = data.maxY() - data.minY();
poseStack.translate(0, height - entity.getBbHeight(), 0);
// ... rest of render logic
Caching fixed the jitter. The concept of caching is a good practice for implementations like this in general. Sooner or later, I would have implemented this anyway. In this case, it doubled as a bug fix.
Improvements
The renderer was in a good state. A happy end you could say, right? My OCD said No! I wanted to improve. Theprevious screenshots and videos show the entities were aligned pretty well, except for the Dragon. However, some entities still appeared a bit off. The scaling did not represent an entity's actual size. Small entities were still very small and hardly recognizable.
A better solution would be to scale all entities to an equal size. To achieve this, I needed to establish a proper relationship between the measured size and the bounding box size.
Approaching this problem needed more investigation. You might have asked yourself why the values in the measuring results look so weird in comparison to the bounding box values. They seem to be starting in arbitrary high numbers instead of the center of the matrix. I was questioning this myself. I realized that the number depended on the position of the entity in the GUI. This meant the vertex positions used the relative coordinates of the entity in the world. This made sense because the PoseStack I used for measuring the entity was already transformed to the position of the slot in the GUI by JEI.
I decided to create a new PoseStack for the measuring logic. If you create a new PoseStack, the underlying matrix is a zero matrix. After implementing this change, the measuring results looked as follows.
MeasuringResult data = measuringCache.computeIfAbsent(
    entityId, id -> {
        MeasuringBufferSource measuringBuffer = new MeasuringBufferSource();
        RenderSystem.runAsFancy(() -> entityRenderer.render(
            entity, 0, 0, 0, 0, 1, guiGraphics.pose(), measuringBuffer, LightTexture.FULL_BRIGHT
            entity, 0, 0, 0, 0, 1, new PoseStack(), measuringBuffer, LightTexture.FULL_BRIGHT
        ));

        return measuringBuffer.getData();
    }
);| Entity Type | min X | min Y | min Z | max X | max Y | max Z |
|---|---|---|---|---|---|---|
| bat | -0.593 | 0.001 | -0.062 | 0.593 | 0.813 | 0.062 |
| blaze | -0.554 | 0.252 | -0.669 | 0.659 | 1.751 | 0.385 |
| cat | -0.134 | -0.004 | -1.093 | 0.131 | 0.600 | 0.654 |
| cow | -0.375 | 0.001 | -0.625 | 0.375 | 1.563 | 0.880 |
| creeper | -0.267 | 0.001 | -0.375 | 0.267 | 1.626 | 0.375 |
| elder_guardian | -1.182 | 0.002 | -4.485 | 1.182 | 2.352 | 1.214 |
| ender_dragon | -6.269 | -0.297 | -6.780 | 6.269 | 3.782 | 8.878 |
| fox | -0.283 | 9.375 | -1.137 | 0.254 | 0.719 | 0.705 |
| ghast | -2.25 | -3.803 | -2.803 | 2.25 | 4.054 | 2.25 |
| phantom | -1.361 | 0.075 | -1.002 | 1.299 | 0.362 | 0.577 |
| silverfish | -0.322 | 0.001 | -0.784 | 0.322 | 0.501 | 0.288 |
| wither | -1.5 | 0.241 | -0.699 | 1.5 | 3.502 | 0.515 |
| zombie | -0.517 | 3.814 | -0.281 | 0.517 | 2.245 | 1.213 |
Confirming the assumption, the vertex positions now started at around 0.0. More importantly, all models seemed to be centered around the origin point, which can be seen by the min and max X/Z values being roughly equal in magnitude but opposite in sign. I was now able to build a relationship between the measured size and the bounding box size.
Since the lower bound of the bounding box is always 0.0 on the Y-axis, and the entity dispatcher uses that for alignment, the max Y value of the measured mesh could be used to determine the actual height offset of the entity model and its scale.
// ... inside render method after measuring
float height = data.maxY() - data.minY();
float scale = SLOT_SIZE / height;
float offsetY = data.minY() * scale;

poseStack.translate(0, -offsetY, 0);
poseStack.scale(scale, scale, scale);
// ... rest of render logic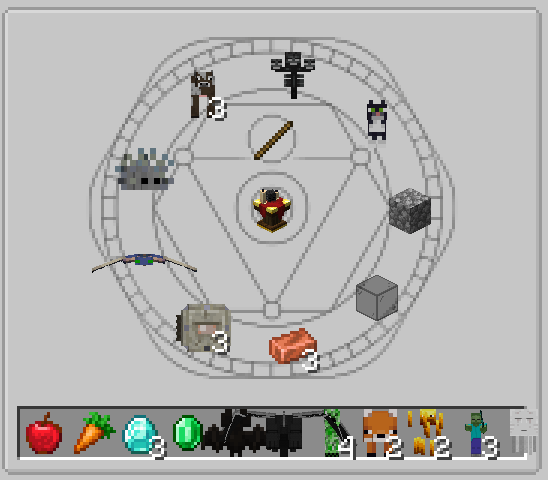
All entities used a consistent size and were properly aligned within the slot. Since there are a few entities being wider than tall, I improved the logic further by taking the width into account. Because entities like the Phantom would become very small if I tried to fit the wings into the slot, I used a modifier that reduced the impact of the width on the final scale.
float width = data.maxX() - data.minX();
float height = data.maxY() - data.minY();
float heightScale = SLOT_SIZE / height;
float widthScale = (SLOT_SIZE / width) * 2;
float scale = Math.min(widthScale, heightScale);
float offsetY = data.minY() * heightScale;

poseStack.translate(0, -offsetY, 0);
poseStack.scale(scale, scale, scale);
Looking closely, the Blaze was not perfectly aligned. The same problem was visible on the Phantom. It was located inside the slot, but it appeared at the bottom. The models of these entities extend below their bounding box, but only in a specific animation state. Since I only measured the entity once in the initial tick, the measuring logic did not capture the lowest point of the model during its animation cycle.
| Blaze | Phantom |
|---|---|
 |  |
To measure the entities in all animation states, I looped for 40 ticks (2 seconds) and called the entity measuring logic on each tick with the same measuring buffer. The measuring buffer then captured all vertex positions during the animation cycle.
// ... inside cache computeIfAbsent
var entityRenderer = mc.getEntityRenderDispatcher();
var measuringBuffer = new MeasuringBufferSource();
var poseStack = new PoseStack();

for (var i = 0; i < 40; i++) {
    var ticks = i;
    RenderSystem.runAsFancy(() -> entityRenderer.render(
        entity, 0, 0, 0, 0, ticks, poseStack, measuringBuffer, LightTexture.FULL_BRIGHT
    ));
}
// ... rest of measuring logic
Because calling this measuring logic 40 times was quite expensive, the caching logic become even more important. Since measuring only happend once per entity type, the performance impact was negligible in the end.
There is an edge case remaining. If an entity has an animation longer than 40 ticks, it might still not capture the lowest point of the model. Most entity animations are shorter than that, so this should be fine.
| Blaze | Phantom |
|---|---|
 |  |
Scissor
To further improve the visual appearance, I wanted to avoid that an entity in the output slot overlaps with other slots next to it.
I used a technique called scissor masking. In OpenGL, the scissor mask is used to define a rectangular area of the screen where rendering is allowed. Any vertices outside this area will not be drawn. Think of it like an invisible frame that restricts where things can be rendered.
Because I never worked with a scissor mask before, I researched how to implement it. I found a method in the RenderSystem class called enableScissor taking the coordinates and dimensions of the scissor rectangle as parameters. After I applied the method, I realized the coordinates needed to be in the screen space rather than the GUI space. This means I needed the x and y positions measured from the corner of the screen. Since this depends on the screen's resolution and the player's GUI scale, obtaining this information was tricky. This is out of scope for this post.
Being blocked by this, I searched for alternatives leading me to another method called enableScissor in the GuiGraphics class.
guiGraphics.enableScissor(0, 0, SLOT_SIZE, SLOT_SIZE);
// ... render entity logic
guiGraphics.disableScissor();
Contrary to the RenderSystem method, this one took minimum and maximum positions for x and y instead of coordinates and dimensions. Since this method was exposed by the GuiGraphics instance and the GuiGraphics hosted the PoseStack instance, I assumed that the required positions are in GUI space rather than screen space.
Applying this method in the render method caused all my entities to vanish. This system is hard to debug so I tried visualizing the positions I used by drawing simple rectangles. The GuiGraphics class offered a simple method for this. It also expected minimum and maximum positions for x and y, as well as a color.
guiGraphics.fill(0, 0, SLOT_SIZE, SLOT_SIZE, 0xFFFF_FFFF);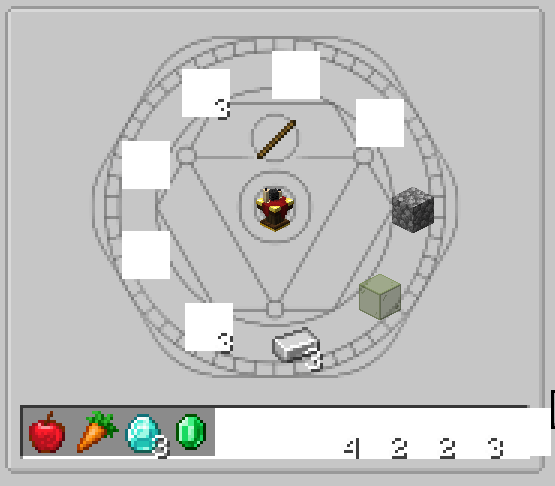
The drawn rectangles were perfectly aligned with the slots meaning my scissor mask coordinates should have been correct. You would assume that the positions you pass to a method in the GuiGraphics are in the GUI space because it hosts the PoseStack and that should use the underlying matrix, right? Wrong!
It turned out the method also used screen space coordinates. Why is that? I have no idea.
Searching through available methods in the matrix of the PoseStack yielded another method transformPosition. It expected a position in 3D space and a vector. It somehow converted the position I passed into screen space and applied it to the vector provided to it. By passing a zero vector, I was able to retrieve the screen space position of the slot. This needed to be called before transforming the matrix because it started at the upper left slot corner.
Vector3f absolutePos = poseStack.last().pose().transformPosition(0, 0, 0, new Vector3f());
int absX = (int) absolutePos.x;
int absY = (int) absolutePos.y;
guiGraphics.enableScissor(absX, absY, absX + SLOT_SIZE, absY + SLOT_SIZE);
// ... render entity logic
guiGraphics.disableScissor();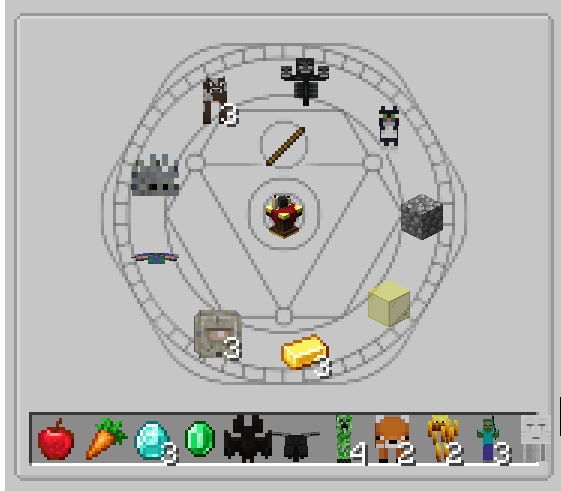
For entities extending beyond the slot boundaries, the overlapping parts were now properly clipped. This was perfect for the output slots. For the input slots, however, it looked a bit strange. I was easily able to fix this by gating the clipping logic behind a boolean flag that is set depending on whether the slot is an input or output slot.
Rotation
Here comes the most confusing part of this whole journey.
All entities are rendered facing towards the camera but there were two exceptions. The Ender Dragon and the Bat. I can't explain what's going on with the Bat. The model rendered inside the GUI seems to be a different model than the in-world model. The Dragon model is indeed rotated by 180° on the Y-axis by default. Why is this? I had no clue. Is this what we call Mojank?
I could only imagine it's a leftover from when the Dragon was first implemented in Minecraft. To ensure I was not doing anything wrong, I checked JER again. To my surprise, JER rendered the Dragon correctly facing the camera. The Bat, however, was also facing away.
| JER Bat | JER Dragon |
|---|---|
 |  |
Looking at JER's implementation, I found it calls the vanilla entity renderer in InventoryScreen. Because method parameters and local variable names are obfuscated in Minecraft, I debugged through the code to see what each value did. After researching, I called the vanilla renderer myself and confirmed the Dragon rendering correctly.
The interesting part in the vanilla implementation was they seemed to adjust rotation properties of the entity instance. Variable names were obfuscated and some of the code did not make sense. Variables were assigned to themselves. This is one of the side effects of decompiled code. It was enough to observe the functionality, though.
float f4 = p_275689_.yBodyRot;
float f5 = p_275689_.getYRot();
float f6 = p_275689_.getXRot();
float f7 = p_275689_.yHeadRotO;
float f8 = p_275689_.yHeadRot;
p_275689_.yBodyRot = 180.0F + f2 * 20.0F;
p_275689_.setYRot(180.0F + f2 * 40.0F);
p_275689_.setXRot(-f3 * 20.0F);
p_275689_.yHeadRot = p_275689_.getYRot();
p_275689_.yHeadRotO = p_275689_.getYRot();
float f9 = p_275689_.getScale();
Vector3f vector3f = new Vector3f(0.0F, p_275689_.getBbHeight() / 2.0F + p_275604_ * f9, 0.0F);
float f10 = (float)p_294663_ / f9;
renderEntityInInventory(p_282802_, f, f1, f10, vector3f, quaternionf, quaternionf1, p_275689_);
p_275689_.yBodyRot = f4;
p_275689_.setYRot(f5);
p_275689_.setXRot(f6);
p_275689_.yHeadRotO = f7;
p_275689_.yHeadRot = f8;Lines 1-5 showed capturing of rotation values of the entity. An entity has many different rotation values that control how it is positioned in the world. The Y body rotation value is the rotation of the main body of the entity. The Y rotation value is the overall rotation around the Y-axis. The Y head rotation value is the rotation of the head part of the entity. Additionally, there are properties for each rotation suffixed with 0. They are used to lerp between the previous and the current rotation for smooth transitions. If you ever played Minecraft, you have probably seen that if you rotate your player, the body remains in the same position for a bit before rotating as well. To achieve this effect, the distinction between the body rotation and the overall rotation is used.
Lines 6 and 7 revealed the body and the overall rotation are set to 180°. The remaining calculation served the purpose of facing the mouse cursor, which was irrelevant in my case. Afterwards, the head rotation was set to the same values.
But what did this mean?
It meant vanilla rotated the entity to face the opposite direction instead of the camera. When the renderEntityInInventory method was called in line 14, it received a scale. This method did the following.
guiGraphics.pose().pushPose();
guiGraphics.pose().translate((double)x, (double)y, 50.0);
guiGraphics.pose().scale(scale, scale, -scale);
guiGraphics.pose().translate(translate.x, translate.y, translate.z);
guiGraphics.pose().mulPose(pose);Line 3 scaled the Z-axis negatively with the full value of the scale. This effectively mirrored the entity towards the camera. This would have made sense if all entities were rotated 180° by default. I recreated the rotation logic without applying the mirroring scale to see what's going on.
// ... inside render method before rendering
float width = data.maxX() - data.minX();
float height = data.maxY() - data.minY();
float heightScale = SLOT_SIZE / height;
float widthScale = (SLOT_SIZE / width) * 2;
float scale = Math.min(widthScale, heightScale);
float offsetY = data.minY() * heightScale;

entity.yRotO = 180;
entity.setYRot(180); // property is not accessible
entity.yBodyRotO = 180;
entity.yBodyRot = 180;
entity.yHeadRotO = 180;
entity.yHeadRot = 180;

poseStack.translate(0, -offsetY, 0);
poseStack.scale(scale, scale, scale);
// ... rest of render logic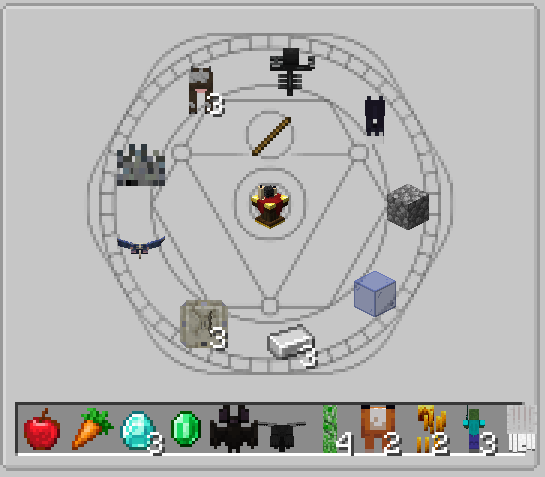
As I expected, the entities were now facing away from the camera. Logically, the Bat and the Dragon should have faced the camera now. However, only the Bat did. Did I have an explanation for this? No, I did not. I just accepted the fact and applied the negative Z scaling to see what happens next.
poseStack.scale(scale, scale, scale);
poseStack.scale(scale, scale, -scale); 
All entities faced the camera correctly. Did this make sense? Not really. But it worked. Sometimes when developing, you just have to accept that things are weird and move on. Especially if you already spent many hours on something that was supposed to be simple.
You would think that mirroring the Z-axis would have had the same effect as rotating the matrix by 180° on the Y-axis, right? Turns out, it doesn't. When I rotated the matrix, the following happened.
For some reason, this caused the Bat to face the wrong direction again. I have no explanation for this behavior. If you have any idea why this is happening, feel free to reach out to me.
The last remaining issue was the Wither. The Wither's head was correctly facing the camera, but the two additional heads were not. After investigating, I found the Wither's additional head rotation was controlled in the AI logic of the entity. This meant it only updates the head rotation under certain conditions, such as when it attacks a target.
No AI ticking logic should be applied to entities in a GUI. Instead, I manually set the head rotations by checking if the entity is a Wither. This was the only case which needed special treatment.
if (entity instanceof WitherBoss witherBoss) {
    var yRotHeads = witherBoss.yRotHeads; // this is private and needs access widening
    var yRotOHeads = witherBoss.yRotOHeads;
    for (var i = 0; i < yRotHeads.length; i++) {
        yRotHeads[i] = 180;
        yRotOHeads[i] = 180;
    }
}
Result
After I applied all the changes above, the final renderer looked as follows. To make things a bit more readable, I extracted the measuring logic into a separate method. The scissor masking logic was now gated behind a boolean flag that is set depending on whether the slot is an input or output slot. Constants have been extracted and the caching logic has been improved.
To display the entities in a more recognizable fashion, I added a bit of rotation to their models. They now faced towards the bottom left instead of the camera. This gave a better view on the models and made them more appealing.

Final Renderer
public final class EntityIngredientRenderer implements IIngredientRenderer<EntityIngredient> {

    public static final EntityIngredientRenderer BOOKMARK_RENDERER = new EntityIngredientRenderer(true, false);
    public static final EntityIngredientRenderer INPUT_RENDERER = new EntityIngredientRenderer(false, true);
    public static final EntityIngredientRenderer OUTPUT_RENDERER = new EntityIngredientRenderer(true, true);
    private static final int TEXT_COLOR = 16_777_215;
    private static final int MEASURE_TICKS = 40;
    private static final int HALF_ROT = 180;
    private static final int SLOT_SIZE = 16;

    private final Minecraft mc = Minecraft.getInstance();
    private final Map<String, MeasuringResult> measuringCache = new HashMap<>();
    private final Map<String, MeasuringResult> measuringResultCache = new HashMap<>();
    private final boolean scissor;
    private final boolean renderCount;

    private EntityIngredientRenderer(boolean scissor, boolean renderCount) {
        this.scissor = scissor;
        this.renderCount = renderCount;
    }

    @Override
    public void render(GuiGraphics guiGraphics, EntityIngredient entityIngredient) {
        if (mc.level == null || mc.player == null || !(entityIngredient.getEntity() instanceof LivingEntity entity)) {
            return;
        }

        var entityId = entityIngredient.getResourceLocation().toString();
        var measuringResult = measureEntity(entity, entityId);
        if (measuringResult == MeasuringResult.EMPTY) return;

        var poseStack = guiGraphics.pose();
        poseStack.pushPose();
        {
            renderEntity(guiGraphics, poseStack, entity, measuringResult);
        }
        poseStack.popPose();
        if (!renderCount) return;
        poseStack.pushPose();
        {
            renderCount(guiGraphics, entityIngredient, poseStack);
        }
        poseStack.popPose();
    }

    @SuppressWarnings("deprecation")
    private MeasuringResult measureEntity(LivingEntity entity, String entityId) {
        var cached = measuringResultCache.get(entityId);
        if (cached != null) return cached;

        var entityRenderer = mc.getEntityRenderDispatcher();
        var measuringBuffer = new MeasuringBufferSource();
        var poseStack = new PoseStack();

        for (var i = 0; i < MEASURE_TICKS; i++) {
            var ticks = i;
            RenderSystem.runAsFancy(() -> entityRenderer.render(
                entity, 0, 0, 0, 0, ticks, poseStack, measuringBuffer, LightTexture.FULL_BRIGHT
            ));
        }

        var measuringResult = measuringBuffer.getData();
        if (measuringResult == null) {
            SummoningRituals.LOGGER.error("failed to measure entity: {}", entityId);
            return MeasuringResult.EMPTY;
        }
        measuringResultCache.put(entityId, measuringResult);
        return measuringResult;
    }

    private void renderEntity(
        GuiGraphics guiGraphics, PoseStack poseStack, LivingEntity entity, MeasuringResult measuringResult
    ) {
        if (scissor) {
            var absolutePos = poseStack.last().pose().transformPosition(0, 0, 0, new Vector3f());
            var absX = (int) absolutePos.x;
            var absY = (int) absolutePos.y;
            guiGraphics.enableScissor(absX, absY, absX + SLOT_SIZE, absY + SLOT_SIZE);
        }

        poseStack.translate(SLOT_SIZE / 2f, SLOT_SIZE, 100);
        poseStack.mulPose(Axis.ZP.rotationDegrees(HALF_ROT));

        Lighting.setupForEntityInInventory();
        var entityRenderer = mc.getEntityRenderDispatcher();
        entityRenderer.setRenderShadow(false);
        RenderSystem.enableBlend();

        entity.absRotateTo(HALF_ROT, 0);
        entity.yBodyRotO = HALF_ROT;
        entity.yBodyRot = HALF_ROT;
        entity.yHeadRotO = HALF_ROT;
        entity.yHeadRot = HALF_ROT;
        if (entity instanceof WitherBoss witherBoss) {
            var yRotHeads = witherBoss.yRotHeads;
            var yRotOHeads = witherBoss.yRotOHeads;
            for (var i = 0; i < yRotHeads.length; i++) {
                yRotHeads[i] = HALF_ROT;
                yRotOHeads[i] = HALF_ROT;
            }
        }

        var width = measuringResult.maxX() - measuringResult.minX();
        var height = measuringResult.maxY() - measuringResult.minY();

        var heightScale = SLOT_SIZE / height;
        var widthScale = (SLOT_SIZE / width) * 2;
        var scale = Math.min(widthScale, heightScale);

        poseStack.translate(0, -measuringResult.minY() * heightScale, 0);
        poseStack.mulPose(Axis.YP.rotationDegrees(20));
        poseStack.mulPose(Axis.XP.rotationDegrees(5));
        poseStack.scale(scale, scale, -scale);

        RenderSystem.runAsFancy(() -> entityRenderer.render(
            entity, 0, 0, 0, 0, 1, poseStack, guiGraphics.bufferSource(),
            LightTexture.FULL_BRIGHT
        ));
        guiGraphics.flush();

        entityRenderer.setRenderShadow(true);
        Lighting.setupFor3DItems();
        if (scissor) guiGraphics.disableScissor();
    }

    private void renderCount(GuiGraphics guiGraphics, EntityIngredient entityIngredient, PoseStack poseStack) {
        var count = entityIngredient.getEntityInfo().count();
        if (count <= 1) return;
        poseStack.translate(10, 9, 200);
        guiGraphics.drawString(mc.font, String.valueOf(count), 0, 0, TEXT_COLOR, true);
    }
}
Conclusion
Rendering entities in a GUI is a complex task that requires careful consideration of various factors, including entity size, offsets, and vanilla rendering quirks. There are many things I still don't fully understand, but I'm happy with the current state of the entity renderer in SR's JEI integration.
Who would have thought a simple idea would lead to a deep dive into a system like this? I certainly didn't expect to spend so much time on this. However, I learned a lot about Minecraft's rendering system and how to work with entities in a GUI context. I hope this blog post has provided some insights into the challenges and solutions involved.
Special thanks again to embeddedt for giving me this awesome idea. Another huge shoutout to the team behind NeoForge as well as ModDevGradle. The mod loader and the Gradle toolchain are awesome tools that make mod development much easier. Shoutouts to the JetBrains team for maintaining a Java runtime that supports DCEVM which makes hot swapping way better.
Lastly, I want to thank you for reading this far. If you have any questions or suggestions, feel free to reach out.